- HubPages»
- Arts and Design»
- Graphic Art & Design»
- Design Software
Simple Photograph Retouching

A raw photograph from a high quality camera can be a work of art in and of itself, but most people desire their pictures to appear more finished, more like the pictures in magazines. The trouble with most magazine photographs is that they are processed through digital editing software by trained professionals to fit the specifications required by their editors. Magazines all over the world, advertisements, even tabloid photos go through a process simply referred to as retouching.
For the purposes of this article, all references to technique and tools are made from the perspective of a digital artist working with Adobe Photoshop. Many techniques can be emulated or duplicated in other digital imaging software packages.
In order to get the best results from your digital image editing, you need to start with a quality 'canvas.' The following tips are a general checklist for choosing the best images to begin the editing process:
- The image should begin in high resolution, which means the image should be large. On my camera (a Canon Powershot S5 IS) the default resolution is 1600 pixels wide by 1200 pixels high.
- The image should be as clear as possible - a blurry picture, a picture that is too dark or too light will be more difficult to edit in a realistic fashion.
- In the case of retouching a headshot, be aware of the angles of light - this is important later!
First Steps
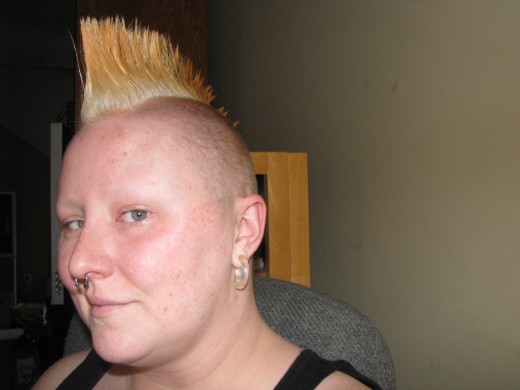
The image above is a raw image I chose specifically for the purposes of this demonstration. As you can see, it is a large image featuring just my face. The lighting was very good, and if I do say so myself, my mohawk looks excellent. There is a little bit of background distraction, but the quality of the picture is very good, and by not wearing my glasses, I reduced distortion around my eyes and nose that would have occurred from glare off the glass and frames.
For this image, the first step in a simple retouching is adjustment of contrast. Once the contrast of the image is adjusted, then you will attend to the sharpness of the image if necessary. From there, more intricate edits may be made.
Blemishes and Discoloration
Correcting blemishes and discoloration in photographs is simple to perform once you have figured out how to properly use your digital editing software's tools and functions. There are multiple ways of correcting these issues in Photoshop.
Using my photo as a reference, note that I have light acne on my face, and what appears to be an ingrown hair on the side of my head above the temples. I have some lines that can be removed or smoothed out, and a blemish on my forehead that I'd want to get rid of as well as redness in and around the eyes and nose.
To remove the acne from the image, change to the Patch tool by pressing j. Draw a small area just around each occurance of acne, click inside the selected area and drag that selection to a portion of skin very close to where the original selected portion is located. This gives you the closest match in skin tone based on light angle and retains the sharpness and texture of the skin in question while masking over the acne that was visible prior. This same method works for masking the ingrown hair and lines or other blemishes Another method of clearing up blemishes and wrinkles is to make use of the Blur tool. This is a less efficient method when you are attempting to retain the texture of skin, but is also quicker. The Patch tool can be used on nearly any defect of skin tone, complexion, or wrinkles, it can even be used to remove bags from under your eyes, or when used carefully, can reduce pudgy areas of the body such as plumpness under your chin.
To correct redness in targeted locations, create a new layer that will be positioned on top of the layer the image is currently located within. Using the Brush tool (keyboard shortcut: b) and an appropriately sized round brush, choose a medium shade of green and paint over the areas you want to remove redness from. Once you've painted over the affected areas, move to your layer palette and change the selection in the dropdown menu that by default reads: Normal to "Overlay." Then, change the opacity setting on this green painted layer to between 15 and 20 percent depending on the skin tone. An alternate method of color correction that will affect the entire image is to use the Color Balance tool (keyboard shortcut: Control + B.)
The photo below presents the changes after blemish masking and color correction.

Finishing Touches
On a simple retouching task, this would likely be where you would want to stop, aside from the possibility of cropping the photo to eliminate dead space. In other cases, you may want to brighten or accentuate some colors such as eye color or the darkening of lines around features like eyes or lips to draw more attention to them. The photo will generally speak for itself, providing you clues as you go along for editing options.
In the image presented, I opted to slightly adjust the eye color as well as darkening the lash lines. Below is the finished product, slightly resized and set side by side with the original image for comparison.


